• Latest
  • Recipes
  • About
  • Blog
I Bake, You Bake
  • Latest
  • Recipes
  • About
  • Blog

Bold North Cookies

As most of you know, my beloved hometown, Minneapolis, just hosted Super Bowl LII. While I’m not a big football fan, I am a very proud Minnesotan and loved celebrating our “Bold North” heritage. As Minnesotans, we embrace winter and everything that comes with it, including single-digit temperatures, multiple layers, and the peaceful quiet that accompanies every snowfall. 

We come from the land of ice and snow...

We come from the land of ice and snow...

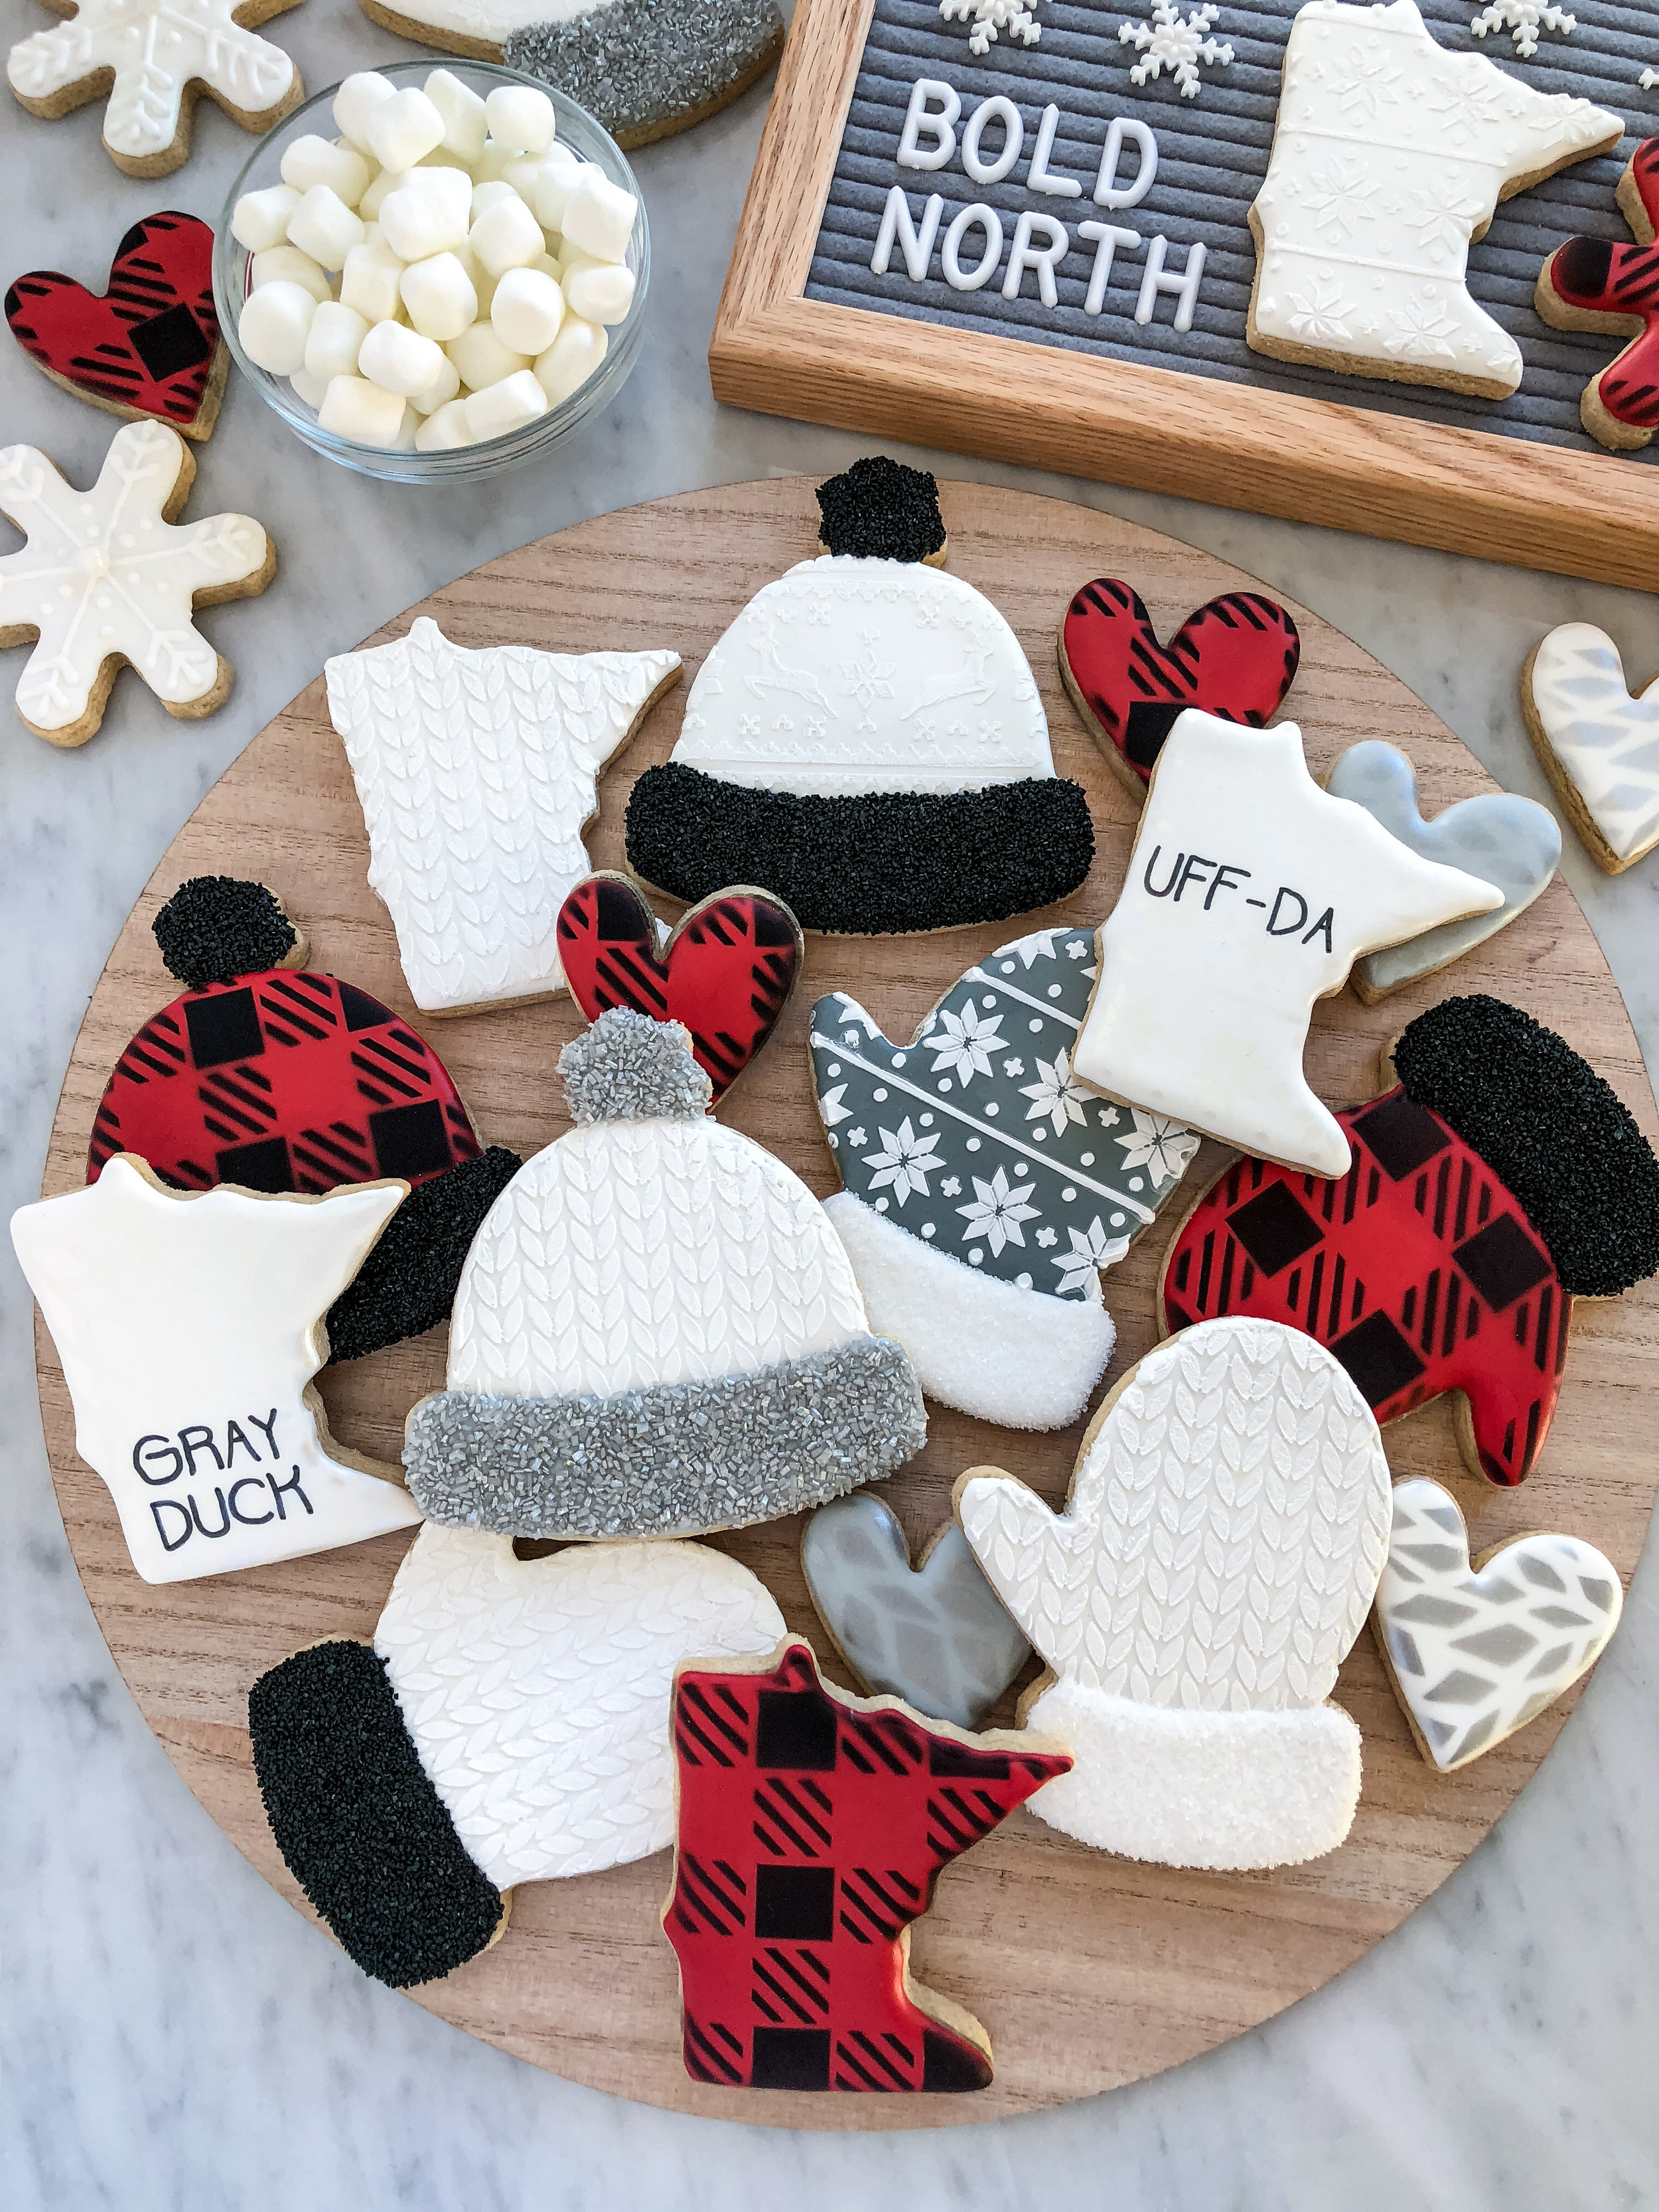
When I was thinking about cookies, I knew I wanted to capture the quirky essence of my home state, which includes our vernacular. If you’ve never been to Minnesota, you should know that our Scandinavian roots linger, leaving us with a number of distinctly Minnesotan phrases, such as “Uff-da”, “You Betcha”, and “Oh, fer cute”. And yes, we play the game as “Duck, Duck, Gray Duck”. 

Uff-da, don’tcha know...

Uff-da, don’tcha know...

I was inspired by Caribou Coffee’s “North” campaign — I thought the buffalo plaid combined with quintessential Minnesota phrases was the perfect meld of style and colloquialism. I combined that with cable knits, icicles, fair isle, and snowflakes to create an authentic Minnesota winter theme. 
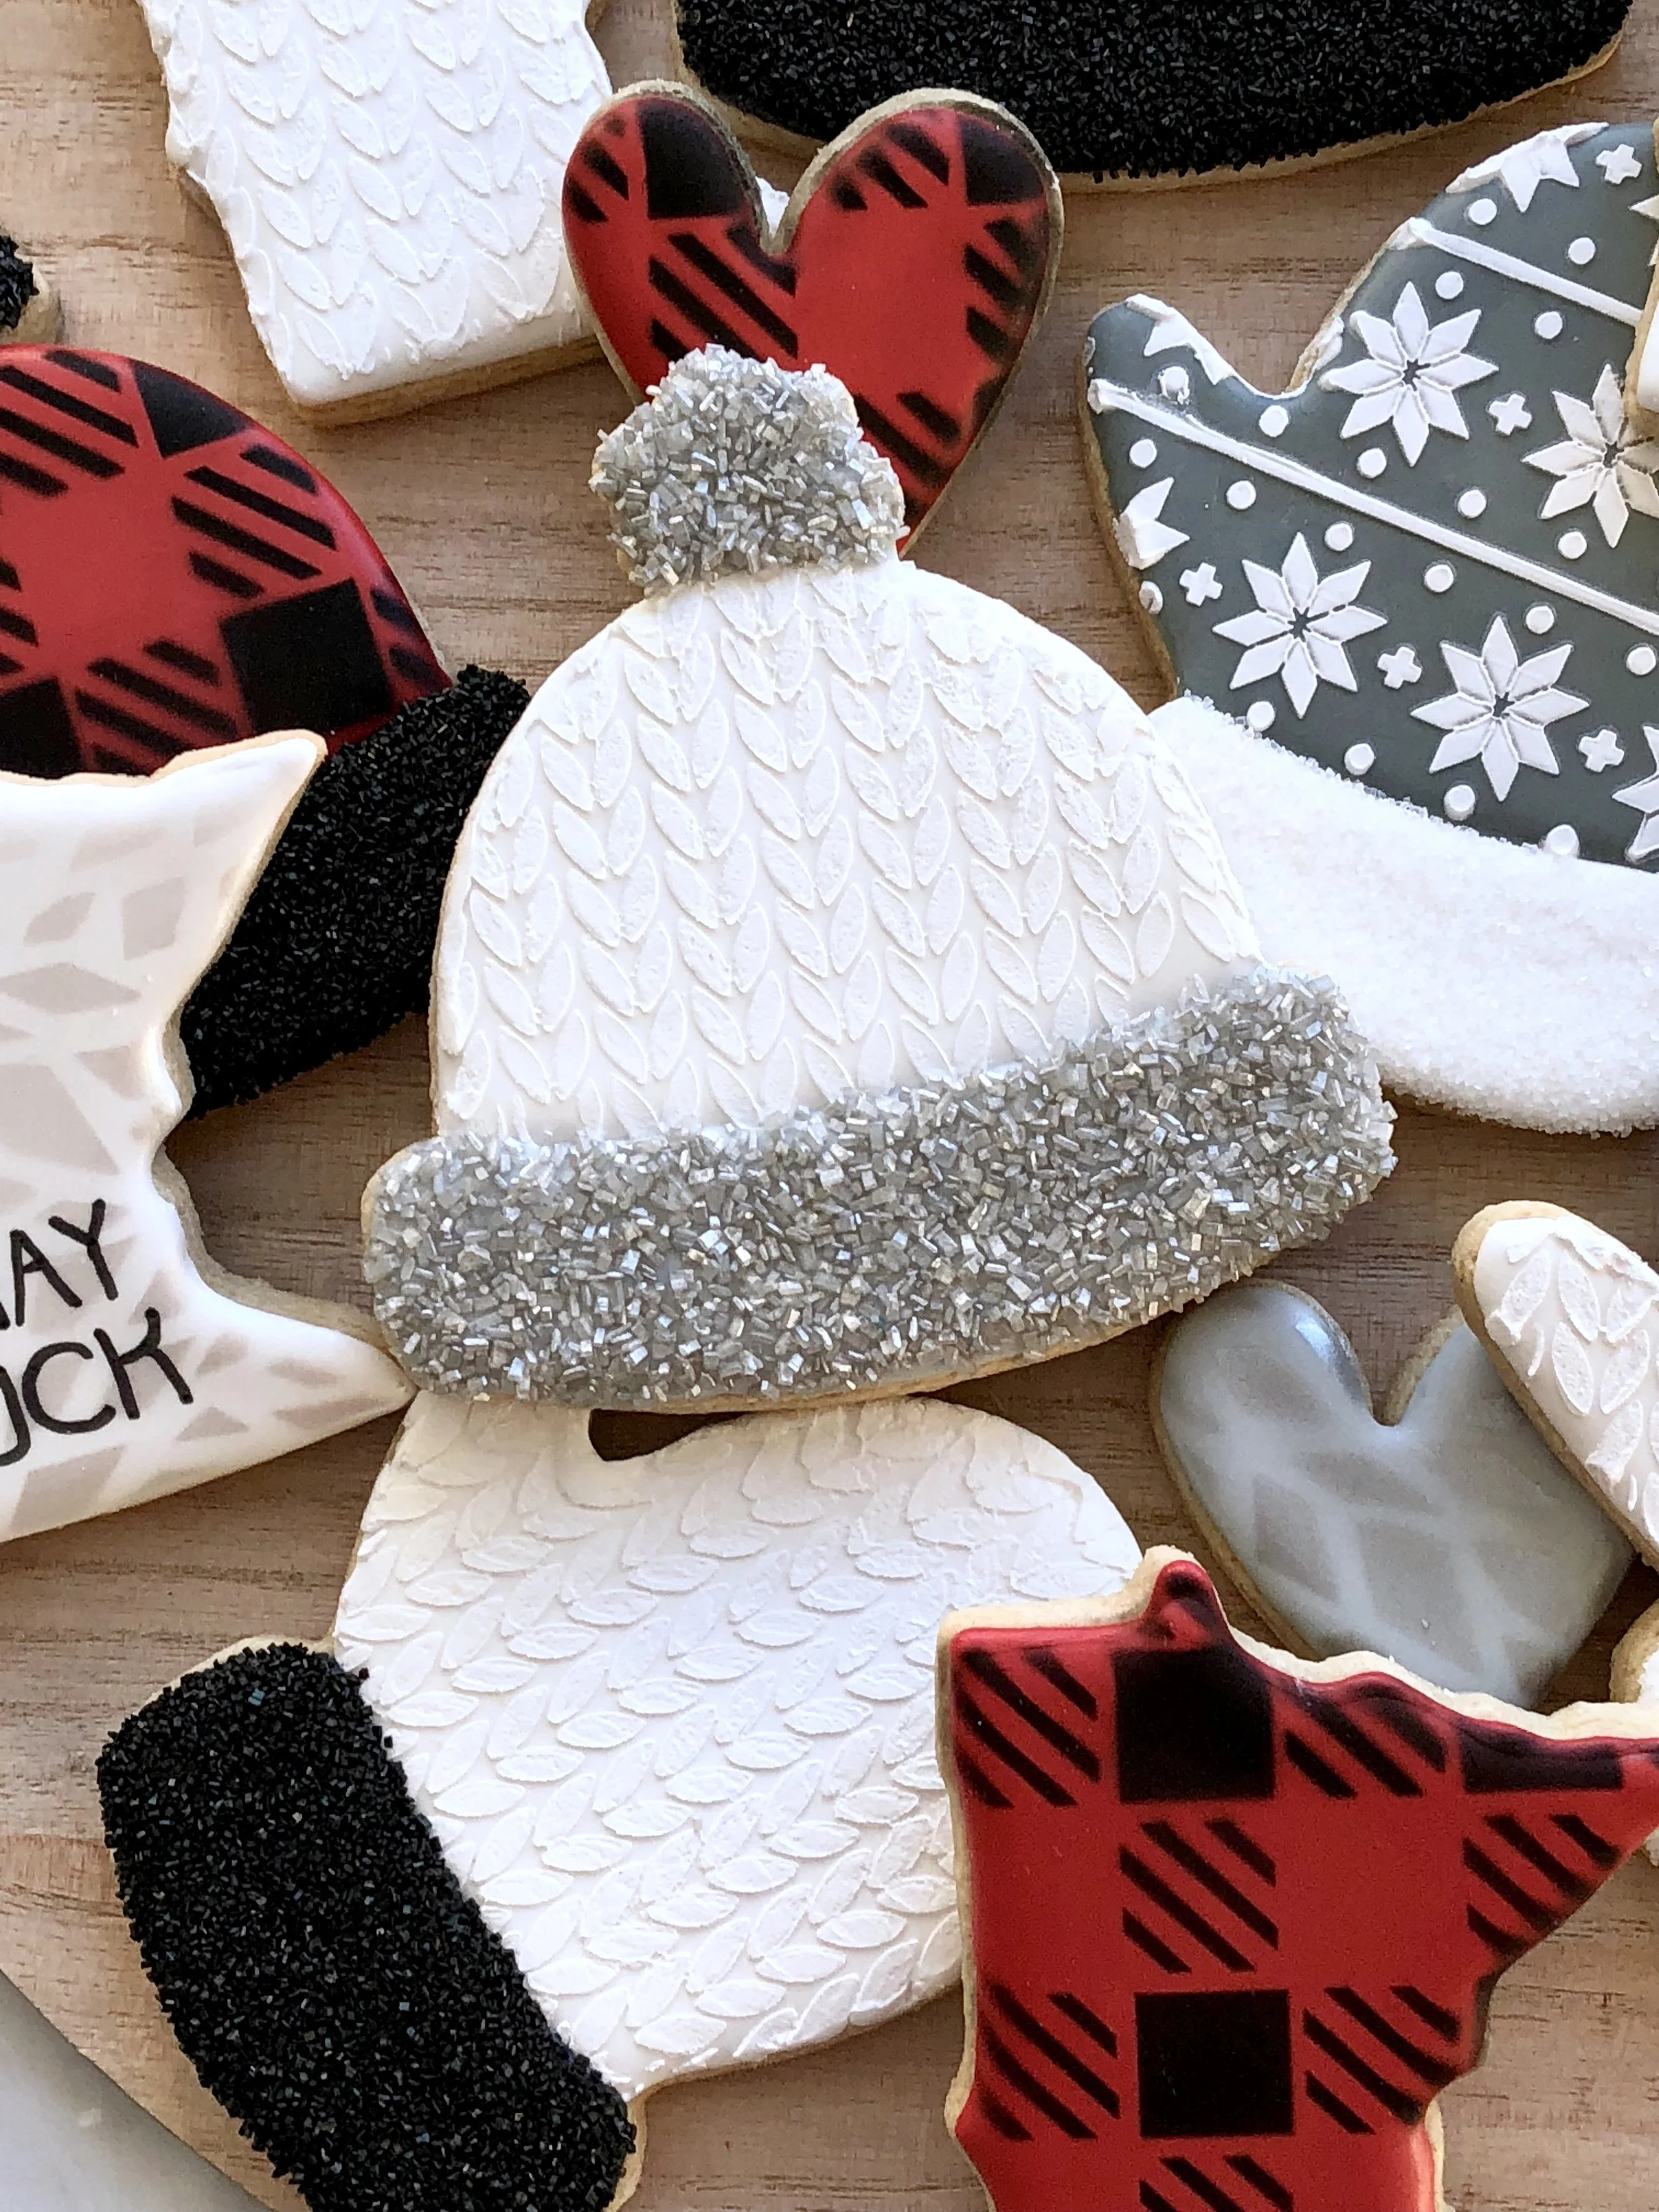
Stencil close-up

Stencil close-up

I love the way these cookies turned out. I won’t lie — the cable knit stencil was more problematic than I expected and airbrushing buffalo plaid is always *fun*, but the results were worth it. I’m finding myself increasingly liking a combination of airbrushed and royal icing stencils — the various textures add a really nice touch. 

Now, come to Minnesota! Yes, it’s cold, but it’s a vibrant, kind, amazing place to live.  

Bold North Minnesota...

Bold North Minnesota...

 Other notes:

  • Buffalo plaid and fair isle stencils from THE COOKIE COUNTESS. Cable knit, icicle, and snowfall stencils from KILLER ZEBRAS.
  • I swear by Dinky Doodle airbrush colors. They’re getting harder to find, but I got mine from The Cookie Countess (see link above).
  • This post is not sponsored by any of the suppliers listed above.
tags: Minnesota, fair isle, cable knit, buffalo plaid
categories: cookies
Tuesday 02.06.18
Posted by Michelle
 

It's a Blush Tone Christmas...

I love non-traditional Christmas cookies. Don't get me wrong -- Santa's and sleighs are fun, but I prefer making sets that are a little less predictable.

BlushToneXmasCookies_IBakeYouBake.jpeg

When it’s time to plan my holiday baking, I tend to avoid using red and green (probably because I’ve just done too many cookies with that color scheme over the years). Sometimes coming up with inspiration is easier said than done, but I’ve had a lot of luck looking at decorations and ornaments for ideas.

Blush_Closeup_IBakeYouBake.jpeg

My favorite place to “research” is Target, because I love their themed trees…and I’m there at least once or twice a week, so you know…convenience. This year they have a “fable”-inspired tree, filled with beautiful blush tones and rose gold accents. I know the rose gold trend has been going on for well over a year, but there’s something about the soft, pink tone that is so subtle and pretty – feminine, yet modern. I was especially struck by these ornament packages:

IMG_0866.JPG
IMG_0865.JPG

I decided to combine the blush tone color scheme with some of my favorite, very minimalistic cookie cutters and add rose gold accents. I also tried Sweetopia’s new Almond Hazelnut Sugar Cookie recipe, which is delicious. I had a hard time finding hazelnut flour in my local grocery stores, so I did have to order it (see notes below), but it was worth it. The flavor is great and I really like the additional flecks of hazelnut in the cookies.

The hazelnut flour adds these nice flecks of color and texture to the cookies

The hazelnut flour adds these nice flecks of color and texture to the cookies

I wish you could see the shine of the rose gold luster dust – it was the first time I (finally) heeded other cookie decorators’ recommendations and used Everclear. I was dumb to not try it earlier; it really does dry almost immediately and leaves the prettiest, shiniest surface without pitting or otherwise impacting your royal icing.

I applied the rose gold luster dust using a fanned paintbrush to get a nice, brushed effect

I applied the rose gold luster dust using a fanned paintbrush to get a nice, brushed effect

Another view of the rose gold luster dust:

Pictures don't capture just how shiny and glossy the rose gold is in person...

Pictures don't capture just how shiny and glossy the rose gold is in person...

I used several Americolor gels to create the blush tones, including blush, soft pink, deep pink, and burgundy. It's hard to see all four colors in the larger group shots, so I've added close-ups of each color below (from lightest to darkest):

View fullsize IMG_0667.jpeg
View fullsize IMG_0050.jpeg
View fullsize IMG_0049.JPG
View fullsize photo.jpeg

I love these cookies so much I almost don't want to give them away, but 'tis the season, right? Instead of dwelling, I'm already wracking my brain trying to come up with another excuse to use this color scheme...Valentine's Day, perhaps?

I love my little gnome!

I love my little gnome!

Other notes: 

  • These were made using Sweetopia’s ALMOND HAZELNUT SUGAR COOKIE recipe and my ROYAL ICING recipes.
  • I had a hard time finding hazelnut flour in my local grocery stores, so I ordered Bob's Red Mill Hazelnut Flour/Meal from Amazon.
  • Gnome and little tree cookie cutters are from HOW SWEET IS THAT.
  • I applied Global Sugar Arts rose gold luster dust using Everclear and fan (on the large trees) and flat (on the reindeer antlers) paintbrushes.
  • This post is not sponsored by any of the suppliers listed above. 
categories: cookies
Thursday 12.14.17
Posted by Michelle
Comments: 1
 

Hello Gorgeous...Hot Chocolate Cookies

I’ve taken a bit of a cookie hiatus these last few months, but with Christmas right around the corner, I knew I needed to dust off the old icing couplers. In digging through all of my cookie cutters looking for inspiration, I came across a mug and marshmallow set I bought last year specifically under the guise of trying Semi Sweet Design’s hot chocolate rollout cookie recipe. Realizing that I still needed to justify their purchase, I got to work -- and I’m so glad I did because you just can't deny the anthropomorphic cuteness of these cookies.

Hello gorgeous little cookies...

Hello gorgeous little cookies...

I didn’t follow the recipe to a T (more on that later), but I was really pleased with how well the dough retained its shape while baking. I split the batch into two – one with mini chocolate chips and marshmallow bits and one without. You can see the difference in the batches below:

Testing with and without chocolate chips and marshmallow bits

Testing with and without chocolate chips and marshmallow bits

The dough with the chocolate chips and marshmallow bits obviously left the cookies slightly bumpy on top, which would have made decorating a nightmare, so I gently flattened them with a large metal spatula. I actually do this with all of my cookies to reduce any air bubbles or other indentations and it worked perfectly with these as well.

Gently smooth the tops of the cookies immediately after removing from oven

Gently smooth the tops of the cookies immediately after removing from oven

Semi Sweet’s Mike mentions in his recipe that the marshmallow bits melted and he had to replace them with new ones after baking. I only had this happen in a few spots (maybe because I added more hot cocoa mix?), but his trick did work. You definitely need to add the new marshmallow bits while the cookies are still warm though, so you can squish them in to minimize those nasty bumps I mentioned above. 

Cookie reverse -- you can see the gaps left by the melted marshmallow bits

Cookie reverse -- you can see the gaps left by the melted marshmallow bits

The result was a delicious, light chocolate flavored sugar cookie that was incredibly fun to decorate. I knew I wanted to keep these cookies really clean and make the emphasis the sweet marshmallow faces, so I stuck to an almost all-white color palette.

Look at those rosy cheeks!

Look at those rosy cheeks!

I used stencils to add some design and experimented using both royal icing and airbrushing techniques. I love the airbrushed gold, but love the extra dimension of the royal icing. I drew the marshmallow faces using edible black marker and added the rosy cheeks -- the color I really wanted to pop -- using a deep pink petal dust.

Fun, wintery cuteness on a plate

Fun, wintery cuteness on a plate

Other notes: 

  • These were made using my HOT CHOCOLATE ROLLOUT COOKIE and ROYAL ICING recipes. As I mentioned above, the cookie recipe was slightly altered from Semi Sweet Designs.
  • I buy so many cookie cutters that I can’t remember where I got these, but  Bobbi’s Cookie Cutters has some really cute, similar options.
  • I get all of my airbrushing supplies from The Cookie Countess. I've tried a number of airbrush brands and swear by Dinkydoodle. It dries almost immediately, which is great for airbrushing beginners like me because I swear it cuts down on overspray. This pearl gold is especially gorgeous.
  • The snowflake and ornament stencils are also from The Cookie Countess.
  • I applied the pink petal dust using a Q-tip. You can use a small, square paintbrush, too, but for cheeks I like the perfect roundness you get with a basic cotton swab. I used Global Sugar Arts watermelon shade to get that bright pink color. Luster dust would also work well.
  • This post is not sponsored by any of the suppliers listed above. 
categories: cookies
Tuesday 11.28.17
Posted by Michelle
 

Harry Potter, revisited

I love Harry Potter. I love the magic and friendship and the fantasy and the character arcs, and everything in-between. So, when I got a second chance to make Harry Potter-inspired cookies, this Muggle was pretty excited. Throw in the fact that I was invited to take a Ravenclaw approach (best House ever!), and I was downright giddy. 

Everyone knows Ravenclaw House is the best House

Everyone knows Ravenclaw House is the best House

My first attempt at making Harry Potter cookies involved my trusty Kopykake and lots of tracing, which worked out just fine. This time, however, I was rocking a super sexy arm brace from my latest bout of tendinitis. In other words, hours spent tracing and hand-lettering wasn't going to happen.

Gryffindor cookies are nice, too

Gryffindor cookies are nice, too

I also knew I wanted to incorporate more than just the Harry Potter logo -- I wanted some quintessential spells and other well-known phrases and landmarks. 

Love the Maurader's Map! 

Love the Maurader's Map! 

I was so excited to find amazing Harry Potter stencils by JustSayItWithCookies. They were an absolute lifesaver. Not only did she expedite the shipping (because I'm terrible at planning ahead), the stencils were nice and thick and worked wonderfully with really stiff royal icing. As you can see, the lettering turned out almost perfectly:

Look at those edges! 

Look at those edges! 

I did go back over the royal icing with some metallic air brushing (silver for Ravenclaw, gold for Gryffindor) just to add some dimension and extra sparkle. I also "aged" the Maurader Map and Expecto Patronum cookies with a light spray of chocolate brown around the edges and a coat of pearl prior to applying the royal icing stencil. 

Sparkley... 

Sparkley... 

I have to say, these cookies were an absolute blast to make. Sure, it took me all-night and I was a zombie the next day, but I loved being able to test some new techniques. These definitely go down as a favorite.  

Harry Potter cookies

Harry Potter cookies

Other notes: 

  • These were made using my FAVORITE SUGAR COOKIE and ROYAL ICING recipes. 
  • All stencils are from JustSayItWithCookies. 
  • I get all of my airbrushing supplies from  The Cookie Countess. I've tried a number of airbrush brands and swear by Dinkydoodle. It dries almost immediately, which is great for airbrushing beginners like me because I swear it cuts down on overspray. 
  • Harry Potter colors, especially Gryffindor red, are hard to mix. You have to be really careful to not add too much color, otherwise it'll run. I used a mix of Super Red, Maroon, and Tulip Red AmeriColor gel to get the Gryffindor shade just right and several drops of Egg Yolk for the gold.  
  • This post is not sponsored by any of the suppliers listed above. 
Monday 06.26.17
Posted by Michelle
 

Surf's Up!

Throwback Thursday to the surf board cookies I made just before my daughter's first trip to surf camp.

image.jpg

This was my first foray into using stencils, which I did with royal icing versus airbrushing. I'm hooked! I love the texture it gives the cookies. 

image.jpg

Can't wait to try making these again!

image.jpg
tags: decorated, orange, blue, beach, royal icing, #tbt
categories: cookies
Monday 08.15.16
Posted by Michelle
 
Newer / Older

Copyright © 2019 I Bake, You Bake